JHipster Micronaut Blueprint 1.0 Release
by Jason Schindler,We are very happy to announce the 1.0.0 release of the Micronaut Blueprint for JHipster (otherwise known as MHipster)! This release represents a culmination of effort and teamwork between the Micronaut Foundation, the JHipster community, and Object Computing to create a Micronaut option for the server-side portion of JHipster applications.
JHipster is a development platform to quickly generate, develop, and deploy modern web applications and microservice architectures. Besides bootstrapping an application skeleton, JHipster offers tools and methods to evolve your domain model and test, monitor, and deploy your application to production with ease. It provides a ready-to-use frontend to manage your domain entities.
The Micronaut framework is a modern JVM application toolkit that’s optimized for runtime performance. With integrations for AWS, GCP, Azure, and Oracle Cloud, the Micronaut framework enables developers to build applications for cloud environments with fast start-up times, high throughput, and a low memory footprint.
The Micronaut JHipster Blueprint generates applications with key features and integrations to help you deploy to production quickly. The blueprint supports two application types: monoliths and microservice applications.
The monolith type can be used for single standalone applications. You can define entities with validation rules and relationships to other entities and package in a user interface written in Angular or React. New applications can be configured to supply their own auth with JWT support or use OAuth 2.0 to allow another application (Keycloak is provided by default) to manage user credentials and access. Pick a SQL database and optionally a cache implementation, and your brand new application is ready to go, complete with Liquibase migration scripts to initialize your database structures, entity REST APIs for common CRUD operations, unit and integration tests, and (if you added a UI) an optional Protractor test suite!
The microservice application type is similar to the monolith with a few key differences. It does not include a user interface and comes with service discovery via Consul or the JHipster Registry (backed by Eureka).
Note: There is a known issue with applications that use both OAuth auth configurations along with Eureka service discovery. For more information, please review this issue..
In a moment, we’ll walk you through how to generate a new application using the mhipster command line tool. For an up-to-date list of supported features, please see the project README. At the time of this release, the full feature list is as follows:
- Project Types
- Monolith
- Microservice
- Authentication
- JWT
- OAuth 2.0
- SQL Database
- MySQL
- MariaDB
- PostgreSQL
- H2
- Cache
- Ehcache
- Caffeine
- Redis
- Build Tool
- Maven
- Gradle
- Front-End
- Angular
- React
- Protractor Tests
- Heroku Deployment
Getting Started
To create your first application with the JHipster Micronaut Blueprint, we suggest that you explore the provided CLI.
Install
Before you can start working with JHipster, you’ll need:
- Docker with docker-compose
- A Java JDK (the Micronaut framework supports Java 8+, but JHipster applications are generally Java 11+)
- Node.js with NPM
1. First, globally install the JHipster Generator and the Micronaut Blueprint:
$ npm install -g generator-jhipster@6.10.5 generator-jhipster-micronaut@1.0.02. Now create a folder for your new project and run the mhipster CLI
$ mkdir hello-mhipster && cd hello-mhipster
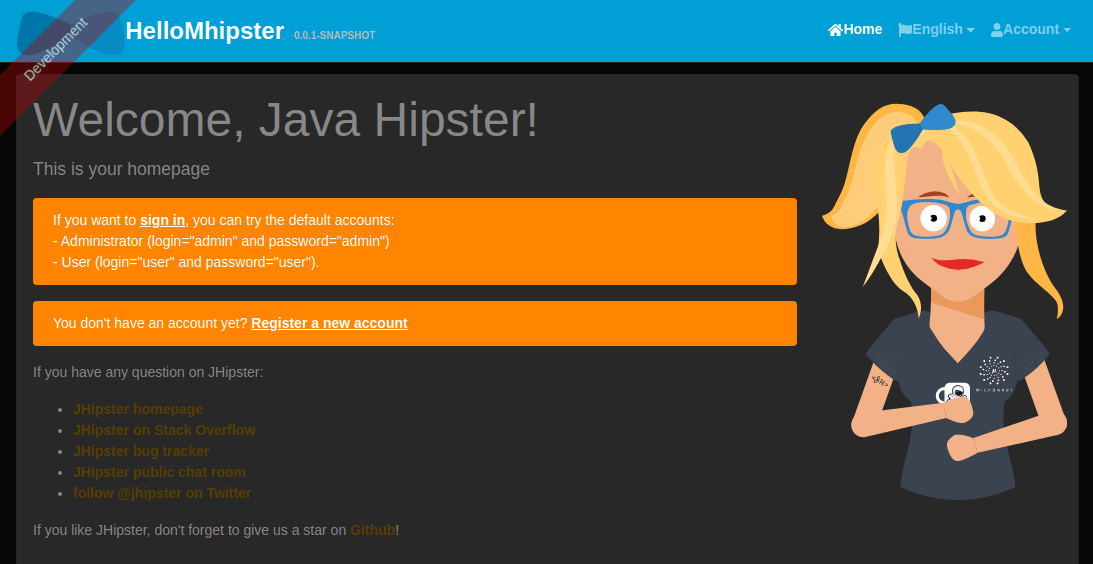
$ mhipsterAt this point, you should be greeted with the following:
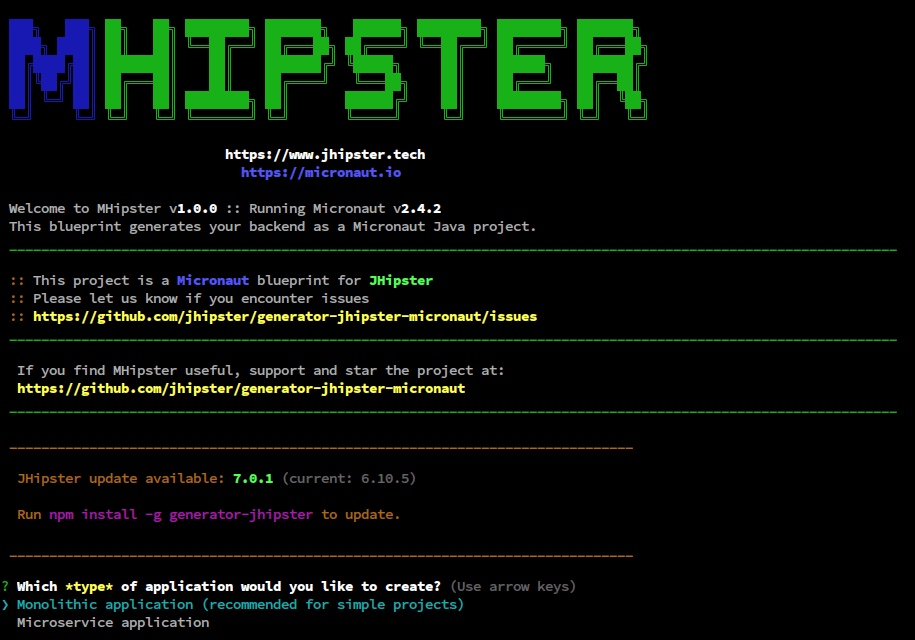
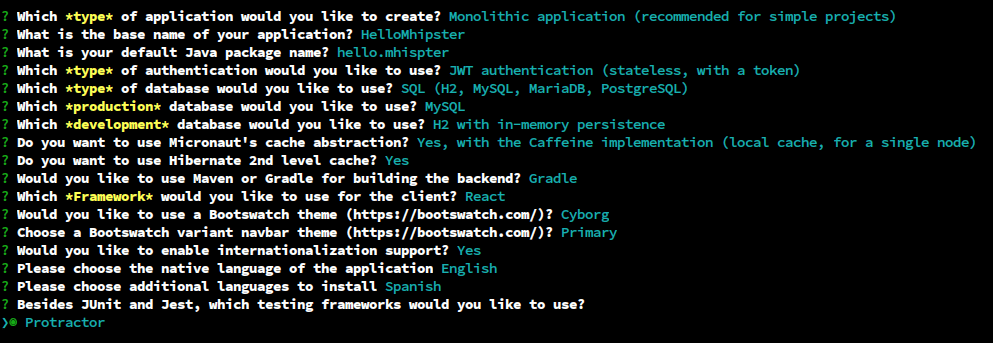
3. Now, you can build a basic application. Using the provided prompts, select “Monolithic application” and provide a base name (HelloMhipster) and default package (hello.mhipster).
4. Once the basic information is in place, it’s time to choose the technologies you want to include. For this example, I’m going to select JWT authentication with a MySQL production database and an in-memory H2 database for development. I’ll use the Caffeine cache and enable Hibernate’s second level cache. Finally, I’ll pick Gradle as my build tool.
5. Now you get to make some choices for your frontend. I’m going to choose “React” with the Cyborg Bootswatch theme and the Primary navbar. Let’s enable internationalization with a native language of English and an additional language of Spanish. Finally, I’ll also add Protractor tests.
Here is a screenshot of my choices:
Once you hit enter, you’ll observe a number of things happening. The generator is creating your project. It’s initializing a Git repo for you, generating necessary source code and configuration files, and if you are installing a client, it will also run npm install on your behalf.
6. Once generation is complete, you have a working application, but it isn’t very interesting. Let’s add some entities to represent schools of fish. First, we’ll create the Fish entity. Each fish must have a name that’s at least 3 characters long. It has a required age that cannot be negative and a water type of FRESH or SALT represented by an enum. At this time, the fish will not have a relationship with any other entity.
$ mhipster entity Fish


After you define the fields and relationships, you will be asked a few more questions, like whether you want to generate a service for this entity or have the REST controller use the repository directly. I’m going to generate a service without a DTO. It’s not read-only, and I do not want pagination.
While the generator is creating the classes required for this entity, it may run into conflicts in existing source code and configurations. You can allow it to overwrite the existing files by pressing y for “yes” or a for “all.”
7. Now that you have an entity, your application is a bit more interesting. Let’s add one more entity to illustrate entity relationships. Create a “School” that groups Fish together. Each school should have a required name and a collection of Fish that are in the School.
$ mhipster entity School
After you create the name field, you can create a one-to-many relationship with the Fish entity.

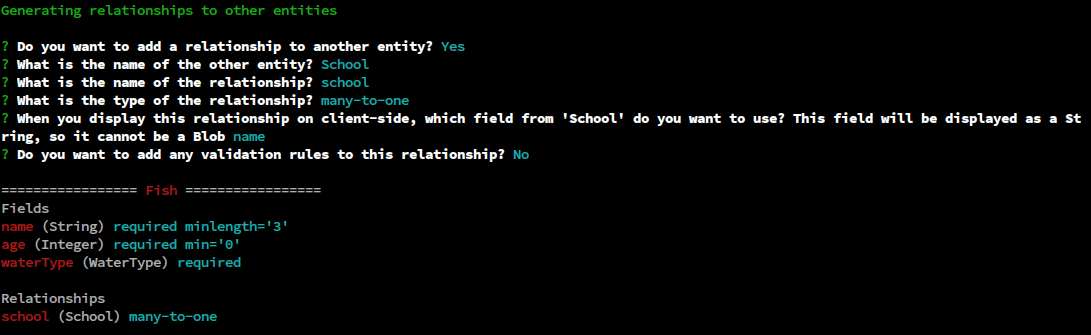
8. Now that you have set up the School entity to contain multiple Fish, add a relationship from Fish back to their School
$ mhipster entity FishYou’ll notice when you run the entity subcommand for an existing entity, you’ll have the option to re-generate the entity entirely or to modify the existing entity by adding or removing fields and relationships. We want to add a relationship, so select the second option.
You’ll first be prompted to add more fields. We aren’t adding fields, so respond N and then reply with a Y when prompted to add a new relationship.
This side of the relationship is many-to-one. One question will ask which field from this entity you want to display on the client, and it will default to id. Change this to name so that when the client displays the school for a fish, we see its name instead of the identifier.
9. Congratulations! You’ve created a non-trivial application with JHipster and the Micronaut framework! Let’s take a stroll around your new project.
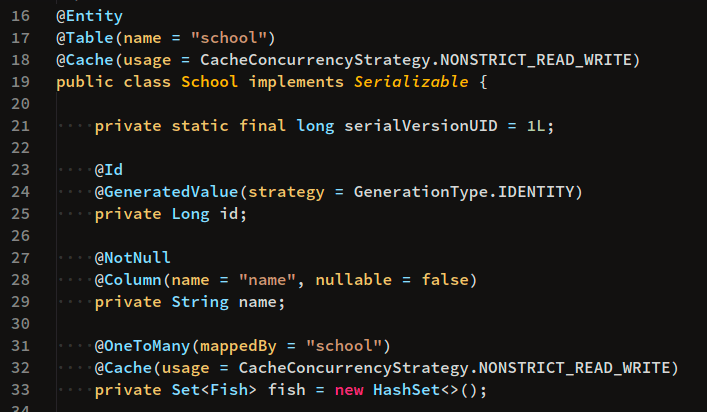
The first item I’d like to direct your attention to is your entity classes. If you followed the base package above, they are located in src/main/java/hello/mhipster/domain. A quick review of Fish.java and School.java illustrates the relationships that we have configured between these two entities, as well as the validation rules and field types we declared:
Next, let’s take a look at the REST controllers. You’ll find them in src/main/java/hello/mhipster/web/rest/.
As you can see, for each entity we created, we also received a REST controller with basic CRUD operations already configured:

As you explore the codebase, you’ll also notice that classes to support user management have been added, as well as configuration files for different environments, Liquibase migrations, a React UI, and unit and integration tests!
10. Now let’s start up our application!
$ ./gradlewBy default, running Gradle with no task will build and run the application with the dev environment. If everything goes well, when you navigate to localhost:8080, you should see your React UI and Harper (the Micronaut JHipster 🙂 )
Now, let’s log in to the application as an admin and select “Entities -> School” from the navigation bar.
You’ll see that a number of “Schools” have already been created for you. This data was created as part of the Liquibase migrations and uses Faker.js. You can disable this behavior by removing the faker profile from Liquibase. Let’s add a new one:

Now, let’s navigate to the Fish page and create a new Fish for our school:
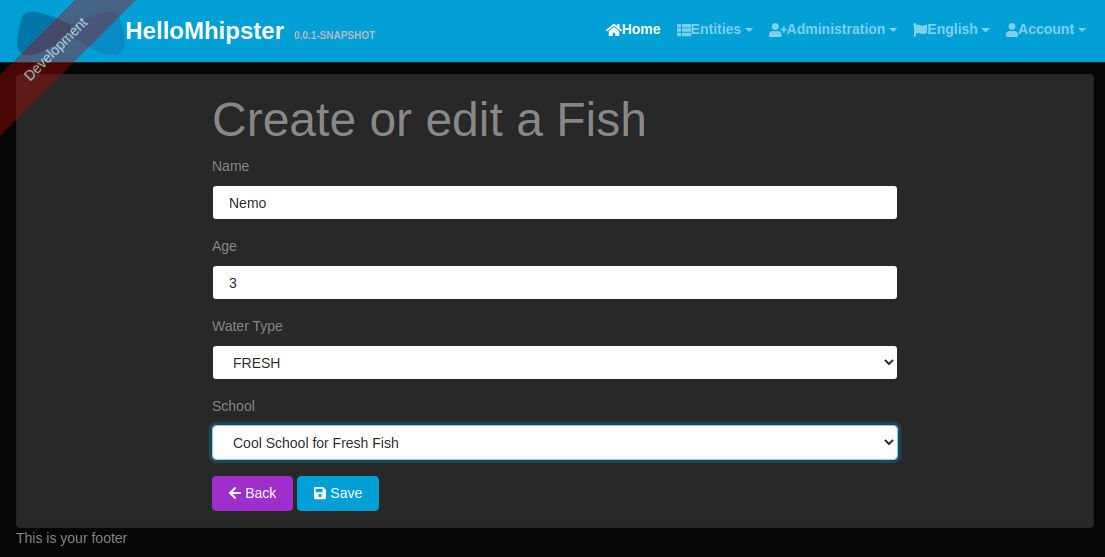
Once you save your new fish, it will show up in your list with a link to the School!

This, of course, isn’t likely what your production app will look like, but it gives you a solid starting place to build out the screens and make the changes needed for your application.
There’s a lot more to see here. The application was also generated with User Management screens, Metrics, Health, and Configuration screens!
Using the JDL
While creating an application with the CLI is a good start, it gets quickly cumbersome, especially when creating a lot of entities and relations.
The JHipster Domain Language (short JDL) is a domain specific language to describe an application (or multiple applications) and its entities, relations, and deployments with a user-friendly syntax.
Various tools help with code completions, syntax highlighting, and UML-like visualization. The fastest way to get started with JDL is to use the web-based JDL-Studio.
Instead of creating the application, entities, and relations by answering multiple questions on the command line, you can define the whole application like this:
application {
 config {
	applicationType monolith
	baseName HelloMHipster
	packageName hello.mhipster
	clientTheme cyborg,
	clientThemeVariant primary,
	authenticationType oauth2
	prodDatabaseType postgresql
	buildTool maven
	cacheProvider caffeine
	testFrameworks [protractor]
	languages [en, de, fr]
 }
 entities *
}

entity Fish {
	name String required minlength(3)
	age Integer required min(0)
	waterType WaterType required
	picture Blob
}

entity School {
	name String required
}

enum WaterType {
	SALT, FRESH
}

relationship ManyToOne {
 Fish{school(name)} to School
}
paginate Fish, School with pagination
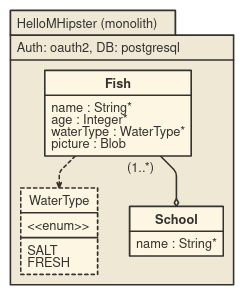
The above JDL is visualized like this:
For options that are not explicitly defined (e.g., devDatabase) a default value will be used. For a full list of available options, have a look at the official JDL documentation.
Instead of executing mhipster, you need to tell the cli to import a JDL file:
$ mhipster import-jdl jhipster-jdl.jdlIn contrast to our first example, we have selected OAuth2/OIDC as the authentication mechanism. This replaces the stateless JWT-based authentication with a stateful, external OIDC provider. By default JHipster supports Keycloak and Okta.
Just like the JWT option selected earlier, the OAuth2/OIDC feature comes with “batteries included,” so you can start using it right away:
$ docker-compose -f src/main/docker/keycloak.yaml up -d
$ ./mvnw
Go to localhost:8080 in your favorite browser and click the sign in link.
You will be redirected to Keycloak to login. Use admin/admin to log in as an administrator.

You should see the exact same user interface (but powered by Angular instead of React) as when creating it manually but have a much smoother experience. You can even change your entities or application configuration and regenerate the whole application using the import-jdl command again.
The authentication server is configured in src/main/resources/application.yml. If you would like to use another OIDC provider (e.g., Okta), you need to adapt these settings:
security:
	enabled: true
	basic-auth:
 	enabled: false
	authentication: cookie
	oauth2:
 	enabled: true
 	clients:
  	oidc:
   	client-secret: web_app
   	client-id: web_app
   	openid:
    	issuer: http://localhost:9080/auth/realms/jhipster
 	login-uri: /oauth2/authorization{/provider}
 	callback-uri: /oauth2/callback{/provider}
Going to Production
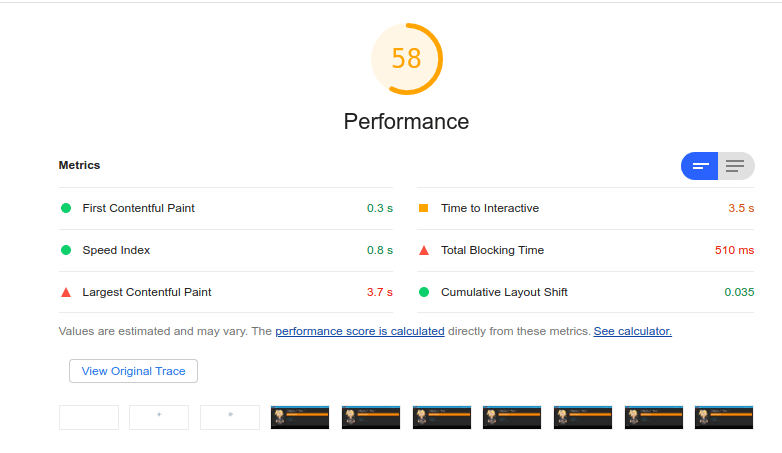
Right now, we have used the application in development mode. This means everything is optimized for the developer. For example, hot reloading for both back- and frontend is enabled, a H2 database is used, and the frontend is not optimized. In particular, this means the whole javascript bundle is 3.1 MB in size when gzipped. This leads to a quite bad performance rating when using lighthouse to audit the application.
You can start the application in production mode via
$ docker-compose -f src/main/docker/postgresql.yml up -d
$ ./mvnw -Pprod
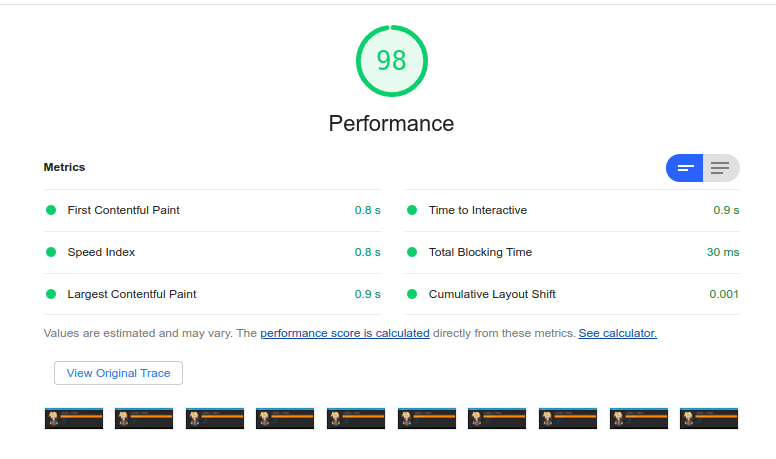
Now the frontend is only 275KB, which results in a much better performance score and smaller loading times for your users. Instead of a H2 database, PostgreSQL is used.
You are now ready to deploy your application to Heroku!
Before you go on, you need to install the Heroku CLI and create and validate an account! For more details see the official JHipster Heroku documentation.
Make sure you have stopped your application. Then run:
$ mhipster herokuYou can use all default choices except for the identity provider. Select Okta such that you don’t need to deploy your own Keycloak instance. Enter an email address for the JHipster Admin user and an initial password, which you must change on first login.
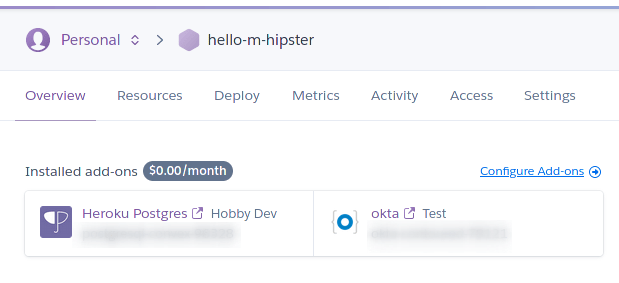
This can take a while to complete. JHipster must create additional configuration files, set up an application, set up required add-ons on Heroku, and push your code, such that Heroku can build and deploy it. The whole build took around 10 minutes when I tried it, so be patient.
When the deployment process finishes, open your favorite browser to the URL in your console or run heroku open. You should be able to log in using the email and password you provided. Okta will prompt you to change your password.
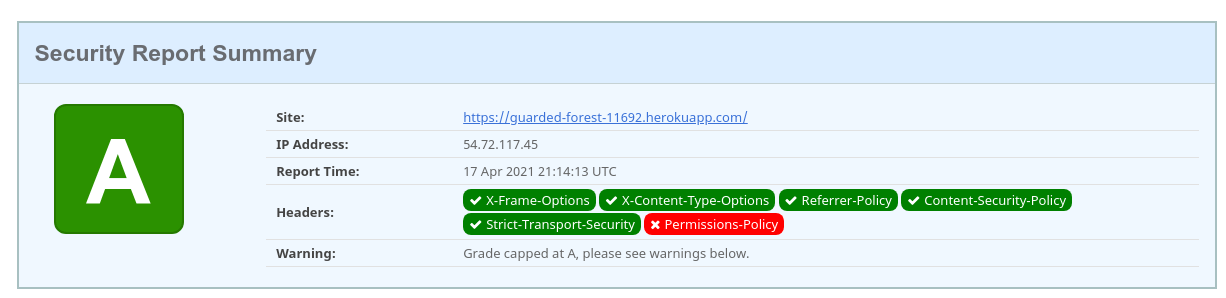
You can use lighthouse again to check the performance score. Visit https://securityheaders.com/ to test for common security headers. It will score an A!
What’s Next?
As usual, the 1.0.0 release is a great achievement, but the Micronaut Blueprint is far from complete when looking at the feature set JHipster supports.
In March 2021 JHipster 7.0.0 was released. This release contains breaking changes and a lot of new features. Therefore the next Micronaut Blueprint will be based on JHipster 7.
Besides getting ready and compatible with JHipster 7, there are a lot of Micronaut-specific issues to be solved. An already long-running task is the support of packaging an application as native image. Because a lot of different technologies are used, the configuration is not trivial, but we have made a lot of progress. Especially with the rise of reactive drivers for SQL databases, reactive programming has become more important. JHipster’s reactive support has moved from experimental to beta status; thus the Micronaut Blueprint should support it too. This involves a lot of work because nearly every template must be made aware of the reactive option.
Additionally, we would like to see more database options available in the blueprint, including support for MongoDB.
As with all open source software, a big piece of the project’s success is due to the contributions and support of the community. Let’s work together to make this project even better!!
Contributing
The JHipster Micronaut Blueprint is an open source project released under the Apache 2.0 licence. The project is hosted under the JHipster GitHub organization, and contributions are very welcome. There are many ways to get involved with the project including:
- Reporting or validating issues
- Requesting features
- Fixing documentation
- Fixing bugs
- Implementing features or enhancements
If you would like to contribute to the project, a great place to start is reviewing the Code of Conduct, contributing documentation, and our current issues. Of particular note, are issues that are a part of the JHipster bug bounty system. JHipster has bug bounties across multiple projects, including the Micronaut Blueprint. If you intend to work on any issue, please post a message on the issue to let us know you’re interested.
Thank You!
A huge thanks to JHipster’s Frederik Hahne, who collaborated with us to write this blog post!
Also, this release wouldn’t have been possible without the support of the JHipster community, Micronaut Foundation, Object Computing, and all of the project contributors. In particular, we would like to thank: